Bob's Journey to Secure Networking: Controlling the Flow
Bob explores Kubernetes Network Policies, learning how to control pod-to-pod communication, isolate namespaces, and secure traffic flows. With Josie's guidance, he builds a fortress around his applications, mastering the art of controlling the flow in Kubernetes.

Bob, now confident in exposing his applications securely to the outside world, turns his attention to a critical aspect of Kubernetes security: controlling the flow of traffic within his cluster.
"My applications are accessible," he muses, "but how do I ensure they only communicate with authorised services and Pods? How do I lock down my cluster to prevent unwanted traffic?"
Josie, ever vigilant, approaches with a knowing smile. "Ready to dive deeper into Kubernetes security, Bob?" she asks. "It's time to explore the power of Network Policies."
Bob nods, eager to enhance the security of his deployments. "I'm ready to build a fortress around my applications!"
📂 Code Repository: Explore the complete code and configurations for this article on GitHub.
What are Network Policies?
Josie explains that Network Policies are like firewalls for your Kubernetes cluster. They allow you to define rules that control how Pods communicate with each other and with external systems.
"Think of Network Policies as security checkpoints within your Kubernetes city," she says. "They ensure that only authorised traffic can pass between different parts of your city."
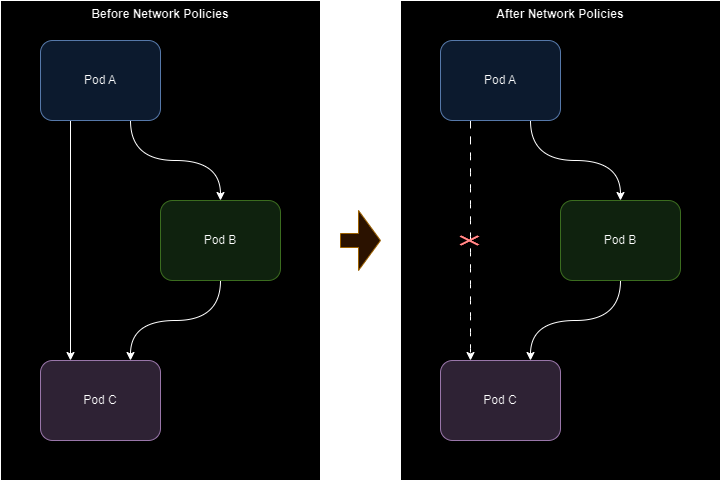
Josie grabs her notepad and shows Bob a diagram illustrating how Network Policies control traffic flow between pods:

"On the left," Josie explains, "all Pods are free to communicate. On the right, after applying a policy, Pod A cannot directly access Pod B. This separation strengthens security and enforces clean communication patterns."
"So we can isolate frontends, APIs, and database Pods," Bob chimes in. "The frontend can only talk to the API, which has access to the database, but the frontend cannot access the database directly?"
"Exactly!" Josie exclaims.
Ingress and Egress Rules
Bob learns that Network Policies use ingress and egress rules to filter traffic:
- Ingress rules: Control incoming traffic to a Pod
- Egress rules: Control outgoing traffic from a Pod
"It's like having separate doors for entry and exit," Josie explains. "You can control who can come in, who can go out, and which rooms they can access."
Practical Example: Egress Rules
To demonstrate egress rules, Josie helps Bob limit outgoing traffic from a Pod to only an external API
apiVersion: networking.k8s.io/v1
kind: NetworkPolicy
metadata:
  name: api-access
spec:
  podSelector:
    matchLabels:
      app: frontend
  egress:
  - to:
    - ipBlock:
        cidr: 203.0.113.0/24
"This ensures that the frontend Pods can only communicate with the external API's IP range," Josie explains.
Default "Deny All" Policies
Josie emphasises the importance of starting with a default "deny all" policy. This means that no traffic is allowed unless explicitly permitted by a Network Policy.
"It's like having a security guard at every door," she says. "Unless you have an authorised pass, you can't enter or exit."
Bob realises the risk of leaving all Pods open to communication. Together, they write a default deny policy:
apiVersion: networking.k8s.io/v1
kind: NetworkPolicy
metadata:
  name: default-deny
spec:
  podSelector: {}
  policyTypes:
  - Ingress
  - Egress
"With this policy in place," Josie explains, "you're starting from a clean slate, allowing only what's necessary."
Practical Examples
Over the next couple of hours, Josie guides Bob through some more practical examples of using Network Policies.
Restricting Pod-to-Pod Communication
Bob wants to ensure that only his frontend Pods can communicate with his backend Pods. "As shown in the diagram, restricting Pod-to-Pod communication ensures each component interacts only with its intended counterpart, such as the frontend accessing the backend" says Josie pointing to her notepad.
With this in mind, Josie helps him create the following Network Policy:
apiVersion: networking.k8s.io/v1
kind: NetworkPolicy
metadata:
  name: backend-policy
spec:
  podSelector:
    matchLabels:
      app: backend
  ingress:
  - from:
    - podSelector:
        matchLabels:
          app: frontend
"This policy ensures that only Pods with the frontend label can communicate with Pods labelled backend. It's particularly useful in scenarios where microservices architecture is used, as it prevents unauthorised Pods or third-party services from directly accessing sensitive backend systems, such as APIs or databases." Josie explains.
Isolating Namespaces
Bob wants to isolate his development namespace from his production namespace. Josie helps him create this policy:
apiVersion: networking.k8s.io/v1
kind: NetworkPolicy
metadata:
  name: production-isolation
spec:
  podSelector: {}
  ingress:
  - from:
    - namespaceSelector:
        matchLabels:
          env: production
"Namespace isolation is essential in environments with multiple teams or applications sharing a cluster. This policy ensures that only Pods within the production namespace can communicate with each other, safeguarding workloads in production from accidental or intentional interference by Pods in other namespaces, such as development or staging" Josie says.
Restricting External Traffic
Bob needs to block all external traffic to his database Pods. They create this policy:
apiVersion: networking.k8s.io/v1
kind: NetworkPolicy
metadata:
  name: database-access
spec:
  podSelector:
    matchLabels:
      app: database
  ingress:
  - from: [] # No Pods are allowed
"This policy isolates the database Pods completely by denying all incoming traffic. Such isolation is critical for databases that don't require direct access from other Pods and should only be accessed through tightly controlled application logic, such as API calls from specific Pods or external services" Josie says.
Troubleshooting Misconfigurations
Bob tries to implement a policy but finds his application isn't working as expected. Josie teaches him to debug:
- Check Policy Application
kubectl describe networkpolicy <policy-name>
- Inspect Traffic: Use tools like
tcpdumporkubectl logsto verify blocked or allowed traffic - Iterative Testing: Start with broad rules, then refine as needed
Wrap up
Bob, now armed with the knowledge of Network Policies, feels empowered to secure his Kubernetes deployments. He understands how to control traffic flow within his cluster, minimising attack surfaces and protecting his applications from unauthorised access.
"Network Policies are like the guardians of my Kubernetes cluster," Bob remarks.
Josie nodded in agreement. "They're an essential part of Kubernetes security" she said. "By mastering Network Policies, you've taken a significant step towards securing your deployments."
Inspired, Bob sat down to summarise the day's lessons in his notebook:
- Network Policies act like firewalls for your Kubernetes cluster, controlling traffic flow between pods and external systems
- Network Policies use ingress (incoming) and egress (outgoing) rules to filter traffic, allowing granular control over pod communication
- A default "deny all" policy enhances security by blocking all traffic unless explicitly allowed, minimising attack surfaces
- Network Policies can restrict pod-to-pod communication, isolate namespaces, and limit external access to pods, providing layered security
- Visualising traffic flow with diagrams helps understand the impact of Network Policies on pod communication and overall security
Ready to take the next step? Try experimenting with Network Policies in your Kubernetes cluster. Start with a 'default deny' policy, then incrementally add rules to observe how communication flows evolve. Hands-on experience is the best way to solidify these concepts!
Use tools like kubectl describe networkpolicy to see how your policies are applied and refine your configurations.
With traffic flows secured, Bob couldn't wait to dive into the next layer of Kubernetes security... "Application Observability: Uncovering Hidden Threats"
