Setting up a dev box in Windows
Using Windows as a development environment can be tricky to set up, this guide shows a few tools and technologies to help bridge the gap and provide you with a wicked development environment in Windows.

Setting up an efficient development environment on Windows can significantly enhance productivity. This guide covers essential tools and steps to create a robust Windows development setup, focusing on cmder, Chocolatey, Visual Studio Code, Docker, and SSH key management.
cmder: A Powerful CLI for Windows
cmder is an enhanced command line interface for Windows, built on top of ConEmu. It offers a more powerful and user-friendly experience compared to the default Windows command prompt.
Installing cmder
- Download the Full version (100Mb zip) from cmder Official Website.
- Extract the files to
C:/cmder. - Launch
cmder.exeand accept the User Account Control (UAC) prompts.
NB: if you've installed choco first you can also run choco install Cmder in a console to install cmder via the chocolatey package manager.
Launching admin sessions
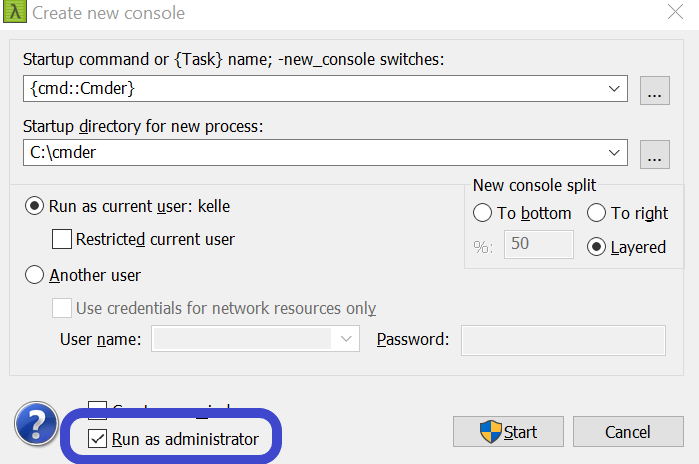
When you open a new cmder window using ctrl+t you can initiate an admin console by checking the appropriate box on the bottom left of the popup that appears:

Incidentally, you can split the console in multiple windows using the New console split options (middle-right) ... supper handy for monitoring logs on multiple VM's 😀
Setting Up Aliases in cmder
cmder allows the creation of custom aliases for frequently used commands. This can be done as follows:
- Open
cmder. - Type
code c:\cmder\config\user_aliases.cmdto open the configuration file in Visual Studio Code - Add aliases in the format
{alias}={command}. For example:ll=ls -lah $*dc=docker-compose $*cdd=cd c:\Users\{username}\development\$*- Note:
$*allows passing additional parameters
Chocolatey: Windows Package Manager
Chocolatey simplifies the installation of software on Windows, akin to package managers in Linux distributions.
Installing Chocolatey
- Visit Chocolatey Installation Guide and follow the instructions.
- As an administrator, open
cmderand run the installation command provided on the Chocolatey website.
Using Chocolatey to Install Packages
- Open
cmderas an administrator. - Search for packages with
choco search {package}, likechoco search vim. - Install the desired package with
choco install -y {package}.
Visual Studio Code: A Versatile Code Editor
Visual Studio Code (VSCode) is a popular code editor supporting multiple languages and technologies.
Installing and Configuring VSCode
Install VSCode via Chocolatey with choco install -y vscode.
- Configure VSCode settings for line endings, tab size, and spaces vs tabs under File → Preferences → Settings.
You can also download it from the official website if you prefer at https://code.visualstudio.com
Recommended VSCode Extensions
markdownlint: For Markdown linting and style checks.ESLint: Integrates ESLint for JavaScript.Docker: Enhances Dockerfile and docker-compose file support.shell-format: Aids in formatting shell scripts.
Docker for Windows: Container Management
Docker for Windows allows running containers natively on Windows 10 Pro and Windows 11 Pro.
Installing Docker for Windows
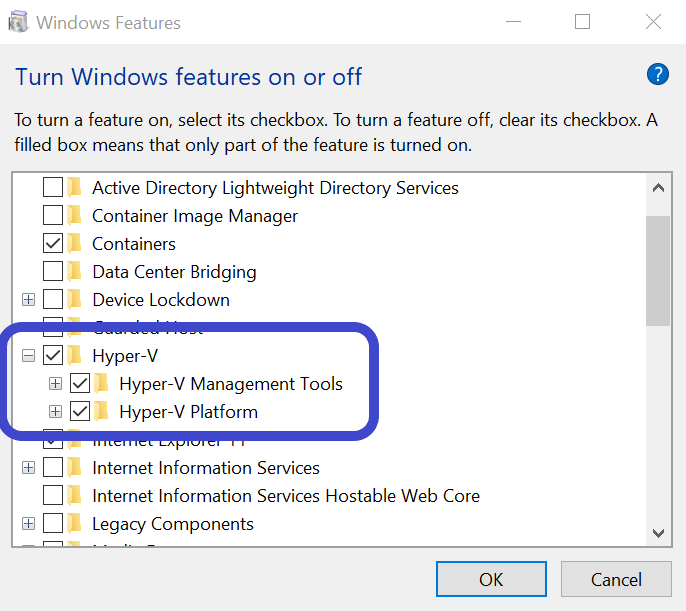
- Enable Hyper-V from Windows Features.
- Download and install Docker from Docker Hub.
- Configure Docker settings, such as shared drives and proxies, from the system tray icon.
If you need to install Hyper-V, it's under the following:

SSH and Managing Keys
Effectively managing SSH keys is crucial for secure access to various services.
- Create a
.sshdirectory in your user folder and akeyssubdirectory for storing different SSH keys i.e.keys/devorkeys/prodif you have a looooot of keys - Generate SSH keys using
ssh-keygenand save them in thekeysdirectory. - Create
config.{type}files for different services and merge them into a singleconfigfile using a custom script.
The bash script for this can be found at https://github.com/GizzmoAsus/sshgenconf but is essentially a script that concatenates all of the config.* files into a single config file.
Conclusion
By leveraging these tools and practices, you can create a highly efficient and customized development environment on Windows. This setup enhances productivity and streamlines your development workflow.
